Rube Goldberg Workshop

The Rube Goldberg Workshop is a 3 hour activity targeted at fourth and fifth graders. Students will learn about energy, simple machines, and modular design by building a small Rube Goldberg machine of their own design, starting with a modular base. Students work in teams of two, and at the end, combine all their machines into one giant Rube Goldberg Machine.

You can see pictures and video from this event here.

Workshop Goals

Students will be able to:

  • Construct and implement simple machines, and integrate their machines into a larger system
  • Engage in open-ended design
  • Describe the energy conversion taking place in their machine
  • Understand modularity

Materials

All of the materials in the "All of" column are necessary for this workshop. The materials in the "Some of" column are not necessary, but you should have as many as possible, to give the students more building options.

All of: Some of:
  • Safety glasses
  • Rulers
  • Blue foam
  • String
  • Pulleys
  • Golf balls
  • Plastic cups
  • Duct tape
  • Scissors
  • Pencils
  • Mousetrap (the game)
  • Cardboard
  • Pipe cleaners
  • Hot wheels tracks
  • Hot wheels cars
  • Rubber bands
  • Straws
  • Cardboard tubes
  • Marbles
  • Pennies
  • Popsicle sticks
  • Dowels
  • Paper bowls

Schedule

The workshop lasts a total of 3 hours.

Time Activity
10 minutes Welcome and Rules
30 minutes Discussion
15 minutes Sketch
1 hour Build
15 minutes Test
15 minutes Improve
20 minutes Combine
15 minutes Cleanup and Wrapup

Preparation

Preparing bases

Cut the blue foam into 2ft x 2ft squares. Make one for every team of two students, and two extras. On one side (the back), build a 1ft stand that a golf ball can rest on. Support the ball from below and behind, so that the only direction it can fall in is off the foam base.

On the other side (the front), build a tower the same size with a pulley on top. Loop a short piece of string over the pulley, with a plastic cup attached to one side. When empty, the cup should rest a few inches off the ground.

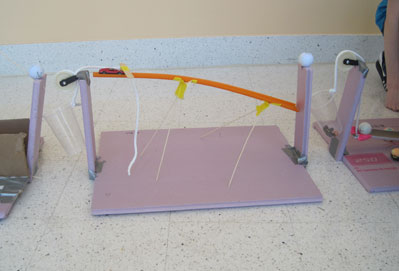
This base is the key to modularity. Hitting the back stand, even lightly, should knock the ball off of the stand. Dropping a ball in the cup should pull it down several inches, pulling the string up on the other side and providing an excellent trigger mechanism.

Making examples

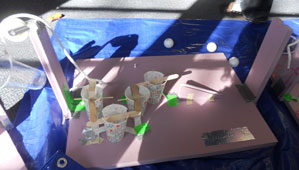
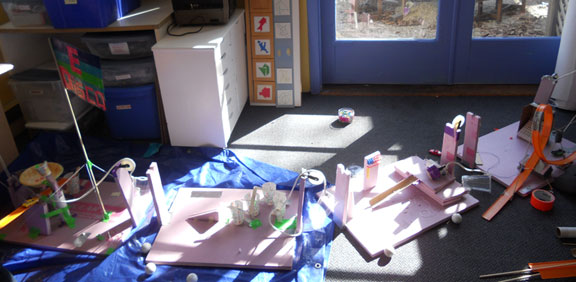
Make at least two examples to show the kids. The examples should cover most of the space available on the board. Be sure to have more than just an object going down a ramp. It may be useful to show off components such as levers flipping each other, bouncing off a trampoline, releasing elastic energy from a rubber band, or dropping a ball into a funnel.

Discussion

  1. What is a Rube Goldberg machine?
    1. A machine which accomplishes something simple though complex means
    2. Show Honda cog video
  2. Who was Rube Goldberg?
    1. Born on July 4, 1883
    2. Graduated from University of California, Berkeley with a College of Mining degree
    3. Drew cartoons for many different newspapers: New York Evening Journal, New York Evening Mail
  3. What are the 6 simple machines? What are real world examples? How might these be useful as part of a Rube Goldberg machine?
    1. Wheel & axle is on a bike/unicycle. It helps objects move without much friction.
    2. Lever is on a seesaw. It can be used to push an object up somewhere when it's pushed down on the other end.
    3. Inclined plane is a ramp. It is useful for helping an object build up speed, while moving it horizontally.
    4. Pulleys are found in many machines. It is useful for pulling on a rope when you pull from a different direction.
    5. Wedge focuses force in a smaller area, like on a knife, or a scissor blade. This won't be part of their machines, but they'll use it in the building process. Demonstrate by pressing the flat end, then the sharp end, of a screwdriver against scrap foam.
    6. Screws turn rotary motion into linear motion, and wedge themselves in place. They might be used to hold objects together, but probably won't be used here, since foam and cardboard are soft enough.
  4. What are other components that might be useful?
    1. Funnel is useful for catching an object and making it go down a small hole. You can build one easily by cutting a hole in a paper bowl, and optionally putting a paper cup with a hole underneath.
    2. Trampoline lets you bounce an object, and it looks cool.
  5. What are the two main types of energy?
    1. Potential energy is energy stored in an object because its position, like a ball on the top of a hill.
    2. Kinetic energy is energy stored in an object because of its speed, like a ball rolling.
  6. Describe how potential and kinetic energy are converted to each other on a ramp. How about a pulley? A lever?
  7. If time permits, show them more Rube Goldberg videos. Have them call out the names of simple machines that they can see.
    1. Tom and Jerry
    2. OK Go - This Too Shall Pass

Protocol

Students work in teams of two to design and construct modular Rube Goldberg machines. Each team starts with an identical base.

  1. Divide students into pairs
  2. Show the example Rube Goldberg machines prepared ahead of time. Show how the end of one triggers the beginning of the next one.
  3. Show students the materials table.
  4. Give each student a copy of Worksheet I to sketch out their intended machine.
    1. Pairs of students will discuss before individually filling out worksheet. They can have the same picture; they need to label the energy transfers themselves.
    2. Sketch designs on worksheet!
    3. Show where potential and kinetic energy are and are transferred
    4. Identify the simple machines and describe how they work
    5. Contain at least 2 simple machines
    6. Identify desired materials
  5. Students should get their designs initialed by a facilitator. If necessary, they should fix problems, or start their design from scratch until it meets the requirements.
  6. Give them a premade base, with the start and end preattached.
  7. Begin construction!
    1. When getting materials from the material table, they should explain why they want the material.
  8. Let them test their module individually
    1. If something doesn't work either have them start again with a new sketch or make a simple fix in their system
    2. Iterate until they have a successful module!
  9. Once several groups have a complete module, have them test them in series. Challenge them to finetune their machine to have it work properly every time.
  10. Once every group is done, line them all up for a spectacular Rube Goldberg extravaganza!

Wrap up

Hand out the survey, and discuss:

  1. What did they learn?
  2. Recap simple machines
  3. Recap energy
  4. What was easy? Why?
  5. What problems did they have? How did they overcome them?
  6. What was fun?